* GadgetBuilder.com *
Last Modified:
Prior to making this center finder I centered work in the minilathe's 4 jaw chuck by putting my scriber loosely in the tailstock chuck with the point in the punch mark on the work. The DTI was used on the body of the scriber to measure the offset but it was fussy work to avoid dislodging the scribe point. When I purchased Rudy Kouhoupt's book I found that he had made a tool (a "pump center") which included a spring to make it easier to use this basic technique. In keeping with the machinist tradition I "improved" his design by placing the spring inside the body rather than external as Rudy did -- each approach has its strong points but any way you make it, it's a useful gadget. View user instructions.
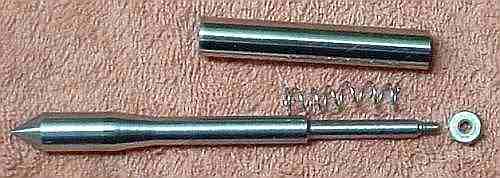
Raw material for my center finder was a 3/8" bar liberated from a defunct line printer because the material in these bars turns very nicely and provides a good finish. This diameter was convenient because I have a 3C collet which accepts it; I use a collet whenever possible because I find it far easier and faster than using a chuck. The body of the center finder was drilled out to 0.150 clear through. It was then drilled out to 0.300, leaving about 1/8" at the tail end at the original 0.150 ID.
The plunger was cut to 4" length - length is arbitrary for the parts except they must fit appropriately. The plunger was placed in the collet with about an inch protruding; a short length was turned to 0.132 and threaded 6-32 using the tailstock die holder. To use a spring liberated from that same line printer, I stretched it a bit because I wanted a larger range of movement, then turned a length on the plunger just shorter than this spring to a diameter which fits within the spring. This was done by pulling an inch or so out of the collet, turning it to size, pulling another inch out, etc. The lazy man's way of avoiding use of a tailstock center (Rudy used a tailstock center). The larger section of the plunger is 0.260, allowing about +/- 30 mils movement of the tip; for a larger range, make this diameter smaller (except a 1/8" long section which the spring bears against). I chose a +/- 30 mil range because it is appropriate for use with my DTI; if you intend to use a dial with a larger range then a different maximum may be useful. I tapered up from 0.260 to full diameter by turning both handles so it isn't a specific taper.
The plunger was reversed in the collet, the compound set to 30 degrees, and the taper was turned on the front of the plunger. A standard 6-32 nut was used to assemble the unit.
Place the completed center finder in the tailstock chuck per the picture above; do not insert completely since there must be room inside the chuck for the nut end of the plunger to move, 1/2 inch or so is enough -- after lightly tightening the chuck, push on the plunger to verify that it is free to move against the spring. Advance the tailstock until the taper point is about 1/8" from the work. Rotate the 4 jaw chuck by hand and, using the point vs the punch mark on the work, adjust the centering until it is nearly centered, i.e. a less than 50 mil orbit is described by the punch mark. One technique is to turn the chuck until the punch mark is at its lowest point, turn the uppermost chuck adjustment slightly CCW, rotate the chuck 180 degrees, and turn the uppermost adjustment slightly CW; repeat as needed. The plunger will not point to the center of the punch mark's orbit because gravity will pull it low -- once the orbit is completely above the point it should be possible to proceed to the next step.
Crank the tailstock chuck closer to the work and guide the plunger's point into the punch mark, then advance the chuck about 1/8" to compress the spring slightly (about 1 turn of the crank on my machine). Maximum travel against the spring is about 1/2" but note that the unit must be installed into the chuck so there is room for the aft end to move within the chuck. Gently rotate the headstock chuck by hand and verify that the plunger shaft doesn't contact the body and force the tip out of the punch mark -- this won't happen if you got the punch mark's orbit small enough as suggested above but check to be sure.
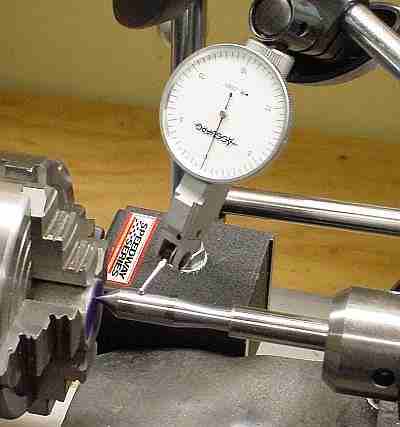
Position a DTI so it contacts the top center of the plunger and adjust the contact to get the needle in range. A long travel indicator can be used in place of a DTI if desired.
Rotate the chuck slowly and note when the needle is at the maximum CCW deflection, then rotate the chuck slightly so the jaw nearest to vertical is straight up; turn the uppermost chuck adjustment slightly CCW (same direction as the needle deflected). Turn the chuck 180 degrees and note that the needle deflects CW (if it doesn't, try again); turn the chuck adjustment CW (again, same direction as needle deflection). Rotate the chuck 360 degrees and note the largest CCW deflection of the needle (which should now be smaller than it was previously). Repeat this procedure until the part is centered as well as desired. When very close to centered, the final adjustments may not require loosening the low jaw CCW, just tightening the high jaw CW may be enough; a bit of practice will develop a feel for when this is appropriate.
I saw this on YouTube, it looked easy to make, the parts were in my scrap box, so now I have one too.
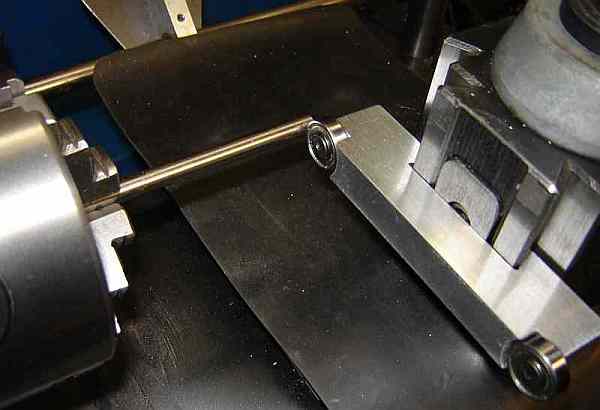
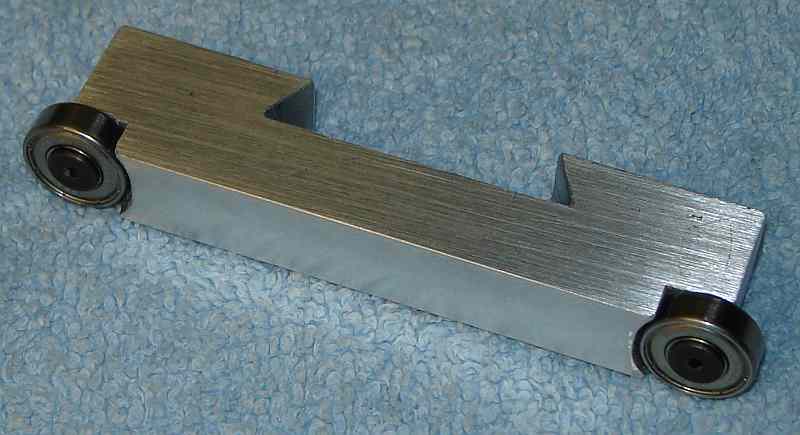
I used a bit of aluminum 3.5 x 0.5 x 0.875 plus a couple 696Z bearings liberated from a dead VCR. The bearings are held with 6-32 flat head socket screws. The size was chosen to match existing toolholders with the idea of minimizing CS movement required between truing and turning (the unit in the video extends much farther). I put bearings on both ends so it doesn't matter which way it is installed; a height setting stop could easily be added.
Per the video, the item to be centered is gripped lightly in the chuck and then touched with the ball bearing to true it up - works a lot like a wiggler except the work is what wiggles. The bump center works well for getting the outer end of work held in a 3 jaw trued up quickly. On small diameter work it isn't as precise as a DTI because the work flexes slightly. Works well for short items which need to be faced, where it is mounted on the other face of the QCTP (of course).
If you have a comment on my site or its contents, click here.