* GadgetBuilder.com * © 2016 John Moran Last Modified:
Click to Enlarge
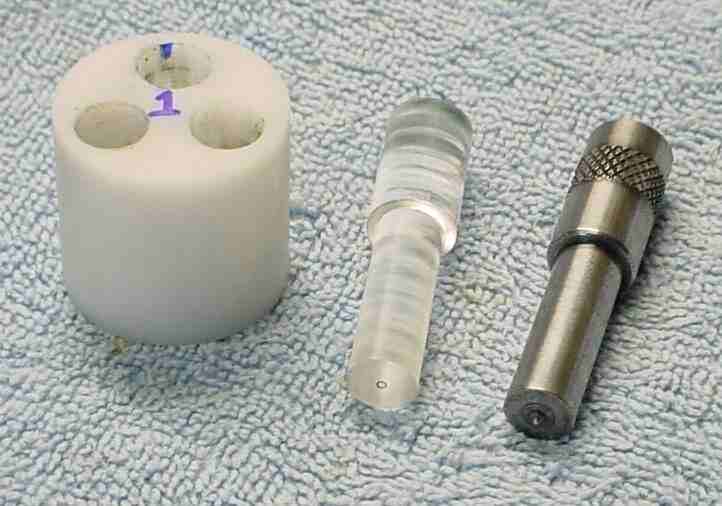
An optical punch is helpful in placing a punch mark accurately on a scribed point. A center punch can then be used to enlarge the mark. My unit is based on one shown on Harlan's Site(Disappeared 3/13).
Building an optical punch is a little harder than it looks, but not a lot. The main difficulty is making the optic; some trial and error established a technique which works pretty well for machining and polishing the optic. Some parts of this technique still aren't perfect so there is room for improvement - if you find a better way, please let me know.
My approach to making an optical punch is to make the base first and ream the holes so they are smooth and identical in size. Then, the optic is made and the diameter carefully reduced to fit the base. The punch is then made and adjusted to fit the base. Any looseness in the fit will affect the accuracy of the unit in use so it is worthwhile to get a reasonably precise fit - but not so tight that the unit moves as you swap the optic and punch. It is also possible to make the optic first and fit the base holes to the optic but it is generally more difficult to get the right size reamer than to turn the OD to fit a reamed hole; only minor adjustment of the optic OD is possible using fine sandpaper.
The base holds the optic and punch for storage plus it is used to position the unit in use. I used plastic for the base but brass or aluminum would work well also. Plastic is difficult to ream to a specific size in one pass so it takes some extra fiddling to get the optic to fit the base properly.
My base has 3 holes but two holes would be a better choice. I made 3 holes with the idea that I'd line up the optic, move it to the spare hole, move the punch to the active hole, and tap the punch. I found that this makes it more difficult to keep the base from moving slightly so I routinely pull the punch out and lay it next to the base, line the optic up on the mark, pull the optic and put it next to the base, insert the punch and make the mark. A single hole base is possible but lacks a way to keep all the parts together for storage. A two hole base is, as Goldilocks opined, "Just Right" :-)
The optic and punch are made from 1/2" diameter material so the base should be about 1.125" diameter or more to accomodate them. The height should be 1" to 1.2" or so. The holes should be far enough apart to allow the punch and optic to be inserted without interfering with each other.
The holes can be made on the drill press or on the lathe in the 4 jaw. They should be drilled slightly undersize, reamed to 3/8" diameter and chamfered; the reamer provides a smooth bore so the optic and punch slide in and out smoothly.
Lucite has a low melting point and this dominates its machining. It turns best with a sharp tool at fairly low speed (under 220 rpm); cutting oil or WD-40 helps to keep the temperature down and reduces the chance of melting. Attempting to cut at high speed may cause a very rough surface due to local melting. Parting Lucite is possible but I generally avoid it by cutting to approximate length in the bandsaw and then facing the cut ends - the low melting point requires very low speed for parting else the end is very rough. Lucite is softer than glass so it scratches easily. Fortunately, minor scratches have little effect on operation of the lens; if scratching is severe, the lens is easily re-polished using the methods below while spinning in the chuck (a collet-like holder isn't needed for re-polishing).
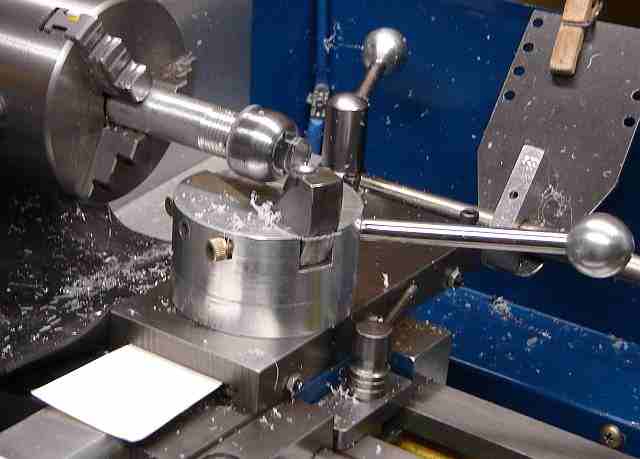
The ball/sphere attachment is, of course, constrained by these restrictions on speed with Lucite. Low speed, lubricant, and a steady hand on the handle are needed to produce a smooth spherical surface. Roughing to shape can be done with heavier cuts because a rough surface from heating will be removed by the finishing cuts. The finishing cuts should be done from outside toward the center, where I move the cutter away for the return to the outside since sometimes it makes contact and leaves circular "zones" on the surface. If there is a tit in the center, use a paper shim under the toolholder to get it precisely on center -- it is difficult to remove this bump during polishing with fine sandpaper (but sometimes it can be done).
Similar temperature cautions apply to polishing: 500rpm or less with WD-40 on 1500 grit paper converts the turned finish to a coarsely polished optic in a minute or two. Wipe the carbide paper to remove the plastic dust/WD-40 and add more WD-40 occasionally. Meguiar's polish for clear plastic on a linen cloth completes polishing in another minute or two. Always ensure there is some liquid (WD-40 for sandpaper, Meguiars or equivalent with cloth) to avoid melting the surface accidentally. It isn't always easy to obtain an optical polish so some trial and error may be needed; sometimes I end up re-doing the lens with the ball attachment if I get over-enthused polishing and cause surface distortion from heat. The lens may end up a little shorter than expected if this happens a couple of times but it doesn't seem to matter with most of the simple optics made using this technique.
Harlan used a file to produce the optic for his punch. My experience is that a fairly accurate spherical surface is needed or the view through the optic will be distorted. The optic for the punch is usable even with distortion because the distortion is symmetrical about the center but I find it disconcerting because the magnification of the circular target changes if your eye moves off the lens axis. I have tried to correct zones on an optic with a file and been unsuccessful: the resulting surface was rough and difficult to polish and/or the view through the resulting lens was distorted.
A 2" length of 1/2" diameter Lucite rod is the raw material; it was available in 6 foot lengths at Modern Plastics in Bridgeport. The ball attachment is the simplest way to make a spherical optic with minimal distortion. A collet-like fixture is needed to hold the Lucite (so the ball attachment clears the chuck) while making the lens as seen here. Static electricity causes the plastic swarf to stick everywhere so a vacuum cleaner is needed for cleanup.
Mount the collet-like holder in the chuck, install the Lucite blank with enough sticking out to allow turning the 3/8 section. Adjust the collet to run true using the DTI. I barely tighten the chuck and tap the collet lightly to get the blank running true, then tighten the chuck.
Face the flat end (bottom) of the optic first, polish it as described above, then turn the 3/8" section of the optic to fit the base using low RPM and lubricant. Most any tool can be used to rough the 3/8 section but the cutoff tool works well to finish it because it has little rake; take light cuts and use generous lube. Trial fit the base onto the optic (leaving it in the collet) and adjust the diameter as necessary for a good fit. I polish the 3/8 section to help it slide smoothly into the base.
To ensure concentricity, add the target on the flat end before removing the optic from the collet. To locate the target, clean off all lubricant and touch a blue Sharpie to the spinning flat end, producing a small dot about the size of the desired target - refine the size with a fingernail. My technique is to then place the cutoff tool adjacent to the flat end to act as a tool rest, advance it so the tool (the point on a set of dividers) can be steadied against the QCTP and rested on the blade of the cutoff tool. The point is then touched to the flat end of the optic to gouge a small circle; the center of this circle is untouched. The sharpie is immediately used to add color to the rough surface of the gouged circle. The ink dries quickly, then the flat end is polished again with Meguiars to remove extra ink; ink remains in the circle because of the rough surface but is removed from the polished area. The center of the circle improves slowly during polishing so take extra time to get this area polished as well as possible since this is where you'll be looking when using the completed device.
Reverse the optic in the collet and use the ball/sphere attachment to make the spherical magnifying lens. A radius of about 13/16" works well for an optic of 1.5" to 2" length; the focus should be about 1/16" beyond the flat end. I tried a smaller radius to get more magnification but it didn't work because the focus was inside the lens. As noted earlier, I cut from the outside edge of the lens toward the center and move the cutter away from the lens when returning it to the outside edge. Polishing is as described above.
The optic provides some small magnification and items should be clearly visible with the end of the lens touching the surface or 1/16" above the surface. Your eye must be near the axis of the optic but need not be close to the lens -- the view is much the same for a considerable distance. The lens gathers light from the surroundings and seems to light up the target area but only if you keep your head far enough away so light can get to the lens. To check the optic, move the holder so the target circle is accurately centered over a small dot, then twirl the optic in its hole while watching the dot; if the dot changes position relative to the target circle then either the circle isn't concentric with the OD or the optic is a loose fit in the holder.
Adjust the height of the base so the flat surface of the fully inserted optic is close enough for a clear view of the surface it is on while keeping the end of the optic clear of the surface so it doesn't get scratched. Glue a piece of super-fine sandpaper to the bottom of the base and use an X-Acto knife to trim excess sandpaper away. The sandpaper keeps the unit from sliding on smooth surfaces as you swap the optic out and the punch in. An alternative is to make a groove in the bottom of the base and fit an O-ring to provide traction without scratching.
The punch is made from 1/2" drill rod, oil or water hardening. The height of the holder has been adjusted to match the length of the optic so the diameter and length of the small section on the punch body must be adjusted to match - relatively easy because steel is more predictable than plastic.
Make the punch using techniques similar to those used to fit the optic into the holder. To ensure concentricity, complete all turning without removing from the chuck. The point is a shallow cone which need not extend to the outside diameter. The length of the 3/8 diameter section should be such that the cone extends slightly from the base when it is fully inserted; trial fit and adjust diameter and length as needed. When this is complete, mark the overall length to approximately match the optic using the parting tool. Knurl the upper part for ease of handling, chamfer the sharp corners with a file, then part it off and face the top so it looks nice. Harden as usual for drill rod; I used oil hardening drill rod and did not temper afterwards because I've had good luck without tempering - YMMV.
In use, I tap the punch lightly, just enough to leave a mark, then put the optic back in and verify the mark is where I wanted it. If needed, I move the unit slightly and tap again (seldom necessary). Then, I feel for the mark with the automatic center punch and enlarge it that way.
If you have a comment on this site or its contents,
click here scroll down and click again.